Arrow Fat Left Icon Arrow Fat Right Icon Arrow Right Icon Cart Icon Close Circle Icon Expand Arrows Icon Facebook Icon Instagram Icon Pinterest Icon Twitter Icon Hamburger Icon Information Icon Down Arrow Icon Mail Icon Mini Cart Icon Person Icon Ruler Icon Search Icon Shirt Icon Triangle Icon Bag Icon Play Video

All Peak

Yoga Before Hiking

Yoga Before Hiking

Everyone has gone through pain after a long hike or an endurance activity. The way our bodies feel after an adventurous activity can set standardsfor how we need to treat it before and after we participate in these endeavors.  Consider how your body feels. Yoga and meditation can help you in preparation for a big day of hiking.

Taking the time to become more mindful of our bodies before hiking will be critical to how we feel afterwards. Below, I have comprised some basic poses and meditations that really help to make space within our bodies and minds before strenuous activities.

5 Poses for Success:

Alexa Accomplished Pose (Givenchy Jones Photography)

Givenchy Jones Photography

  • Shoulder rolls. Start by rolling your shoulders forward. Do not do big circles. Allow your body to make space and if you hear any cracks, grinding, etc. then stop. This will allow you to create space in your arms and shoulders and hold your neck through a long hike. Make sure to switch directions before stepping into the next stretch.

Alexa Pose (Givenchy Jones Photography)

Givenchy Jones Photography

  • Neck extension. Extend your arms out by your sides and lengthen your back and spine. This can be done standing up or sitting down. While keeping the length in your neck and spine, tilt your head to the right side of your body but refrain from collapsing your head to one side. Attempt to keep the length in your spine traveling to your neck. Stay there for around 30 seconds and complete the same on the other side.

Alexis forward fold pose Givenchy Jones Photography

Givenchy Jones Photography

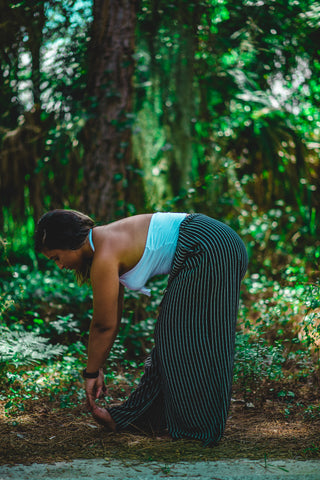
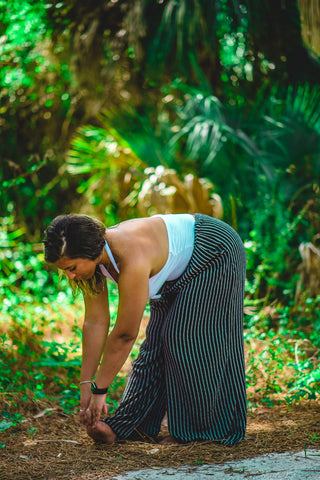
  • Forward fold. Take your legs a hips width apart and keep your back actively lengthened. Slowly lower your head and move closer to your legs, slowly, until you have reached the point of the most resistance. Stay there for a while and really stretch the back of your legs for the hike. Refrain from sitting back on your hips—shift your weight forward and actively lengthen your back.

Alexis quad stretch 1 Givenchy Jones Photography

Givenchy Jones Photography

Alexis quad stretch pose 2 Givenchy Jones Photography

Givenchy Jones Photography

  • Quad Stretch. Take your legs a hips width apart and keep your back actively lengthened. Reach your right arm back and grab your right foot and straighten your back. You should be sure to keep your knees together and really accentuate moving your foot as close to your back as possible. If you find that you cannot reach your foot, take a bend in your left leg and attempt to grab from there. Stay there for around 30 seconds and then repeat on the other side.

Alexis hamstring stretch 1 (Givenchy Jones Photography)

Givenchy Jones Photography

Alexis hamstring stretch 2 (Givenchy Jones Photography)

Givenchy Jones Photography

  • Hamstring Stretch.Take your legs a hips width apart and keep your back actively lengthened. Take your right leg and flex the foot while placing it in front of you. While keeping your back straight, bend forward to your leg. Ensure to keep your back straight. Stay there for around 30 seconds and then repeat on the other side.

Considerations: Hold the poses for as long as needed for your body individually. Use the ground or whatever is around you for support if needed. There is no “set” place you should feel a stretch, you feel it where your body needs it. Have fun with this—you’re taking the time to prepare for a great hike!

Alexis seated pose meditative (Givenchy Jones Photography)

Givenchy Jones Photography

Meditation:

Take 5 minutes before your hike to think about the reason why you are there that day. Listen to the sounds around you and become immersed in your position within the world.

___________________________________________________________________________

It is important to take time for ourselves before strenuous activities. Yoga helps us to find our balance to ensure our bodies are ready for the journey ahead. Building these tools (yoga poses and meditation) into our schedule can be fundamental to our success. Try a little love for your body before a hike and see how you feel afterwards!

Namaste | Alexis  

Alexis is the Founder of Aesthetic Chaos, a blog that focuses on adventure and well-being. Alexis is currently obtaining her 200-yoga teacher training certification at St. Pete Yoga, a Yoga Alliance registered yoga school. You can visit her website at aestheticchaos.net.

Photos by Givenchy Jones Photography

Continue reading

8 Things to Think About Before Your Hike (These Can Make or Break Your Trip)

8 Things to Think About Before Your Hike (These Can Make or Break Your Trip)

We were enjoying a quiet morning in a small Swiss town of Grindelwald and talking to our new friend Luca as he praised the beauties of the First - Platte Schynige trail. I remember my easily excited friend Peter almost shouting, "Dude, let's go right now, today." And we did, later that day we were on one of the most demanding trails in the Alps.

Continue reading

Can’t Sleep? Try These Top 10 Tips to Ease the Z’s

Can’t Sleep? Try These Top 10 Tips to Ease the Z’s

Summit camping trips are like pregnancy. You tend to forget about the pain you suffered and only remember the end result. One of the toughest parts of a trip is often the first night’s sleep on the trail. Your body is not use to the changes. The altitude, outside noise and unforgiving ground offer you no solace compared to your comfy bed.   

Rest assured fellow trail companions. There is hope. Allow me to share with you some of the best tips scoured from hiking blogs and trip reports…as well as personal experience from a tried and true insomniac (me).   The first few tips should be common sense, but are worth mentioning.

Continue reading

Top 10 Reasons to Use a Vacation Home Rental For Your Next Fourteener Trip

Top 10 Reasons to Use a Vacation Home Rental For Your Next Fourteener Trip

I had my first vacation home rental experience when I visited San Francisco for work last year. The experience opened my eyes to the many benefits of renting a vacation home instead of staying in a hotel.  My Hilton Honors will surely dwindle as a result.  

First, the full disclosure…I am not being compensated one iota for my opinions.   HomeAway.com is mentioned below and they were a client of mine in a past life.  I have used their service and think they offer a great selection – as do other similar businesses. I do have friends that now own vacation home rentals, but they aren’t featured here, and I’ll gladly stay at their places anytime they ask me too!  

After countless trips to Colorado from my home turf in Texas, I could kick myself for never considering staying at a rental home before.  The concept is perfect when planning a group trip.  HomeAway.com lists over 9,080 “mountain” home rentals in Colorado alone.  In true Letterman fashion, here are the Top 10 reasons why you want to rent a vacation home the next time you set out on a mountain adventure:  

10. Get a little closer to the mountain or trailhead.  

9.   Home cooked meals:  You can save money by buying and cooking your own food, but someone has to do the dishes.  

8.   You can launder those smelly, damp trail clothes so your buddies don’t have to smell you the rest of the trip.    Most homes have a washer and dryer with detergent available to use.  

7.   Free parking and no extra fees.  You normally have to leave a deposit though, which is fully refundable.  

6.   Tranquility:  No need to battle with the wedding party down the hall for sleep.  A vacation home rental can be tucked away, deep down a mountain road, letting you extend your bond with nature by opening the windows at night and listening to the sounds of the forest.  You may have to contend with snoring from your buddies, but it is a great trade off.  

5.   Amenities:  Often times you can find a vacation home rental with a breathtaking view, fire pit out back or hot tub ready to soothe those achy muscles.  

4.   Praise:  If, as the planner of this group outing, you manage to make it all happen, you may get a pat on the back and hear the following, “Wow, this place is awesome. What a great idea!”  

3.   More room to relax. Vacation homes average 2,000 square feet, while hotels average 400 square feet. ‘Nuff said!  

2.   Price!  When you split the cost of a vacation home rental between a group, you can greatly reduce your cost per person.  

1.   You can store a ton more beer in a full-size fridge than that tiny ice bucket from your hotel room. Colorado has more micro-brews per capita than anywhere else and it would be a sin to not enjoy the multitude of brands and styles.

Continue reading

Keep Your Crampons Under Control

Keep Your Crampons Under Control

Full-on rigid crampons, semi-flexible hiking crampons, and ice grippers like Kahtoola Microspikes (which are really just small, chain-mounted crampons) can be real life-savers when crossing ice or hard-packed snow. They can also tear right through your other hiking gear if you're not careful.  

Have you stashed your super-light (and super-expensive!) alpine jacket in your pack with your crampons? Guess what, the crampons will win. Got an extra hydration bladder rattling around in there? Not for long -- unless you stow your crampons in a protective case. If your crampons are in a proper case, you can pretty much toss them anywhere. No case? Try these tips on for size:  

  • Apply protective tip covers to the crampon points before you put them away.
  • Nest the sharp ends together. Or in the case of Kahtoolas, which don't have any real structure -- just chains holding the spikes to the stretchy rubber "upper" -- roll them up with the pointy ends facing in. Use a small bungee or a super-size twist tie to hold everything together.
  • Stow crampons in a separate compartment within your pack. If your pack has a separate bottom compartment (sometimes called a sleeping bag compartment), this is potentially a great place for your crampons. Smaller front pockets are good storage spots too, as long as you've got the crampons' sharp points under control.
  • Strap the crampons to the outside of your pack, either nested or with points facing out. For a little extra security, clip them in place with a carabiner that goes through both crampons and around at least one secure attachment point (or strap) on your pack.
Lisa Maloney is an avid hiker and freelance writer based in Anchorage, Alaska. She's the author of 50 Hikes Around Anchorage and writes for About Hiking. You can follow Lisa's hiking adventures on Twitter at @About_Hiking or on Facebook.

Continue reading

My 7 Favorite Tips for a Safe Comfortable Snow Hike

I live in Alaska, where two things are inevitable: Snow and mountains. Even in the middle of spring, it's still common to see lingering patches -- or swathes -- of snow across my favorite trails. But that's no reason to stay inside! Here are my favorite tips for a safe, comfortable hike in the snow:  

Continue reading

Packing For Your First Fourteener: Beenie Weenies NOT Allowed.

Packing For Your First Fourteener: Beenie Weenies NOT Allowed.

A quick Google search will yield tons of information on preparing for your first Fourteener.  Expert retailers like REI or EMS will no doubt promote their best water-wicking, insulating, ultra-light, GPS-enabled, diode-emitting gear.  Do your homework, heed their advice, shop around and do NOT come ill prepared.  For that purpose, I’ll share my story and a list of essentials I hope you find useful.  

My first Colorado Fourteener was Blanca Peak in the Sangre de Cristo range.  I had no idea how brutal the mountain could be.  You see, I grew up in New England and did my share of hiking and camping.  What the hilly woods of New England couldn’t offer, I sought out by travelling to get my “nature fill”:  high desert, beaches, rafting trips, canoeing northern lakes, a week in the Montana Wind River Range, etc.  

What I didn’t realize is that I’ve never been this high up before. At 14,000 feet you have 1/3 less oxygen.  Also, these mountains are so massive that they command their own weather.  

That first trip was a disaster.  My hiking mate Kevin (a Houston-based flatlander) was experiencing the Fourteeners for the first time too.  Let’s just say, it was his first time in the mountains, let alone trying to bag a Fourteener.  We hadn’t made it half way to base camp when exhaustion crept over Kevin.  Happy to help in my delirious pre-dawn state, I offered to take Kevin’s pack.  It was heavy to say the least.  After about an hour of lugging his gear, I had to stop and question, “What in the world did you pack?”(Expletives omitted).  Among a laundry list of things NOT to pack, Kevin opted for canned goods reminiscent of his childhood, the chief culprit being a few cans of Beenie Weenies.  

Once I was on the mountain the next day, and a mere 500 feet from the summit, I got shellacked by the cold and damp wind.  We were running late and it was into the afternoon as clouds gathered around the summit and the risk of lightning strikes seemed imminent.  No gloves, no hat and a thin cotton-lined nylon jacket with a long-sleeve shirt were all that protected my core.  It wasn’t enough.  I was risking frostbite AND hypothermia.  I had to turn back.  

I’ve since returned to climb Blanca and some other mountains over the years.  Here are some tips I learned (the hard way) and essentials to pack:  

Tips: 

  • If the temperature will drop below freezing, sleep with your water bottle/bladder in your sleeping bag.  This will keep you from turning blue trying to suck frozen water when you are gassed.
  • If you are not going to have the time to properly acclimate to the altitude, take Ginko biloba.  It’s all-natural and will help expand the capillaries in your brain to move oxygen when you need it.  Begin taking 100 milligrams, twice a day, one week prior to your ascent, to get used to the effects.  Continue taking it while on the mountain with lots of water.  Headaches and altitude sickness are no fun after all that preparation and this herb is a best-kept secret.
  • Wrap some duct tape around your Nalgene / water bottle.  It can come in handy to keep a wound shut, patch a hole in your tent and a half a dozen other uses.
  • Practice the “rest step” when you are hiking steep slopes and struggling to breathe.  It may bring a slower pace, but when confronted with turning back or pacing yourself, the “rest step” can save your trip.
  • Buy “Mountaineering, The Freedom of the Hills”  and read it thoroughly. If you want to own the bible of tips and techniques for mountaineering, this is the guide for you.  From easy to technical, this book promises to be dog-eared over the years.
  • Use a timer to give yourself intervals to rest.  This keeps you from stopping too much and gives you short, reachable goals to achieve on the mountain.
  • Soak your legs (at least up over the knees) in a cold mountain stream when you are done hiking.  The cold water will immediately reduce the swelling on your muscles and joints and decrease the pain you’ll feel the next day.  This process goes better with a cold beer too!
  Essentials:
  • Boots:  In my mind the most important element to hiking.  Get a pair with some water proofing to survive stream crossings and ankle support.
  • Gaiters
  • Convertible pants:  With summer hikes, you will want the option of shorts in the afternoon.
  • Trekking poles:  Maybe not an essential but they will save at least 20% wear on your knees and provides extra support and balance.
  • Hat:  80% of heat loss is through the top of your noggin.  A good hat will help.
  • Sunglasses
  • Wicking layer shirt
  • Waterproof Jacket
  • Tent
  • Sleeping bag:  Check the temperature and match your ratings.  If you don’t have a properly-rated bag, it may be a long sleepless night ahead for you. 
  • Smartphone:  It’s smart to have at least one member of your party with a phone in case of emergency.  Keep it off unless needed.  They are also lighter than cameras for taking that summit shot.
  • Water: A full hydration pack and spare bottle is important.  You can’t last long with out proper hydration.
  • Map
  • Compass: Yes, a compass!  You’d be surprised how many people get lost.  A map is useless if you can’t read it and don’t know which way is which.
  • Trail food:  Energy bars or GORP will give you the extra push to make it to the top.
  • Backpack
  • Sleeping mat
  • Flashlight: I prefer headlamp. Your call.
  • Toilet paper:  Keep in a Ziploc.
  • Matches / lighter: Also keep in a Ziploc bag.
  • Bug spray:  In most cases you won’t need it.  In the cases you DO need it, mosquitoes can be voracious and a little spray can keep you sane.
Keep in mind that these are just the essentials.  Obviously, there are loads of gear and apparel that will make your trip more enjoyable.  Let us know how you fared and remember, no Beenie Weenies!

Continue reading